We have created a simple guide for you to get ALPR for Hanwha Cameras.
Upon motion or vehicle detection, the Hanwha Camera sends an image via FTP to Snapshot Cloud. We analyze the image for license plate recognition and show results in the PR Dashboard (which can be forwarded to the ParkPow ALPR Dashboard).

Hanwha Cameras with just motion detection are suitable for use-cases where vehicle speeds are under 35 mph (e.g. parking, drive-thru). Cameras with vehicle detection can support faster vehicle speeds (e.g. street and highway monitoring).
The integration works for the following Hanwha Cameras below. An * indicates that the camera has vehicle detection.
Step 1.1. Access the camera’s setup menu.
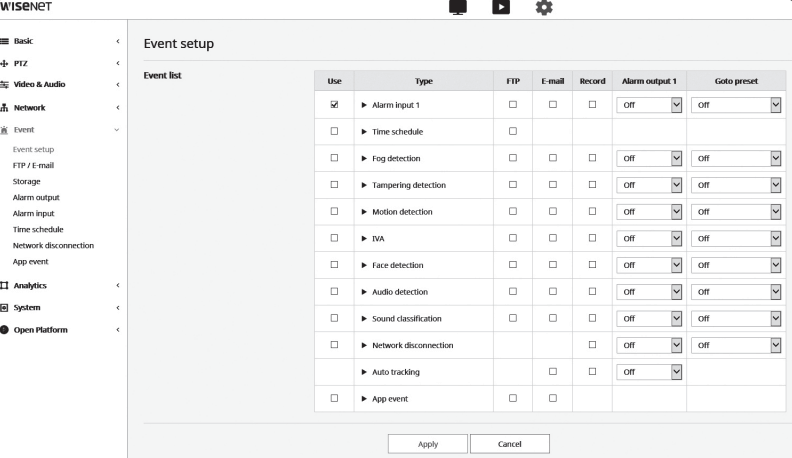
Step 1.2. Select the “Event” tab.
Step 1.3. Click on “Event setup”.
Step 1.4. Activate the desired event detection items from the list.
Step 1.5. Click on “Apply” when finished.

Step 2.1. Access the camera’s setup menu.
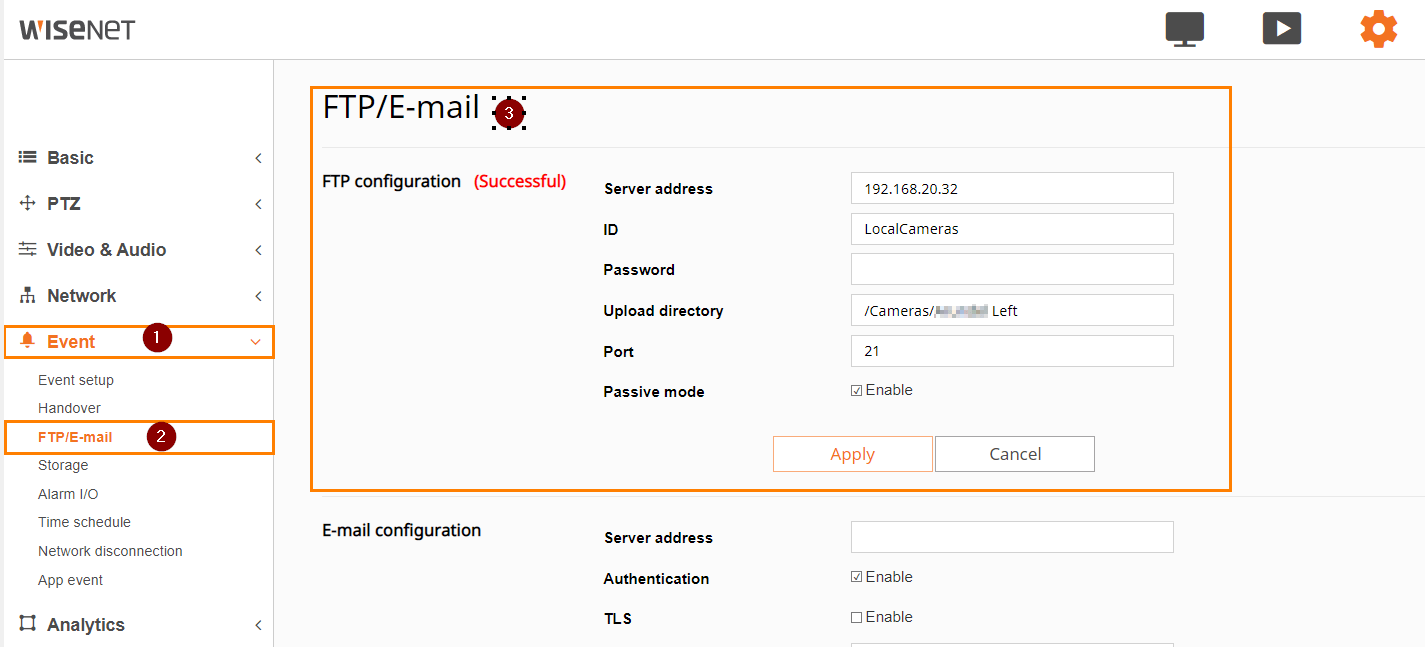
Step 2.2. Select the “Event” tab.
Step 2.3. Click on “FTP / E-mail”.
Step 2.4. Choose “FTP configuration”.
Step 2.5. Enter the IP address of the Plate Recognizer FTP server in the “Server address” field.
Step 2.6. Enter your FTP server username and password in the respective fields.
Step 2.7. Specify the FTP path where you want to transfer the images in the “Upload directory” field.
Optionally, adjust the port number if required by the FTP server settings. If necessary, select “On” for passive mode.
Step 2.8. Click on “Apply” when finished.

Step 3.1. Sign up on Plate Recognizer.
Step 3.2. Click on Start Page in the Top Navigation Bar. Then, click on Integrate with Camera Software.
Step 3.3. Click to request for FTP.
Step 3.4. Please wait up to 24 hours for approval. Once approved, you will receive an email with your FTP credentials.
TIP: Make sure to check your spam folder in case the email’s there.
Step 4.1. In your Plate Recognizer FTP page, you can create a sub-directory for each camera. The sub-directory name is used as the camera name.
Step 4.2. Enter the Country Code(s), such as us-fl for Florida or gb for the United Kingdom. Full Country Codes can be found here.
Step 5.1. Access the camera’s network settings.
Step 5.2. Navigate to “Network > Advanced”.
Step 5.3 Click on the “FTP” tab.
Step 5.4 Fill in the following elements with the information from your Plate Recognizer FTP credentials:
Step 5.5.Click “Save” when finished.

Step 6.1. Go to the camera’s setup menu.
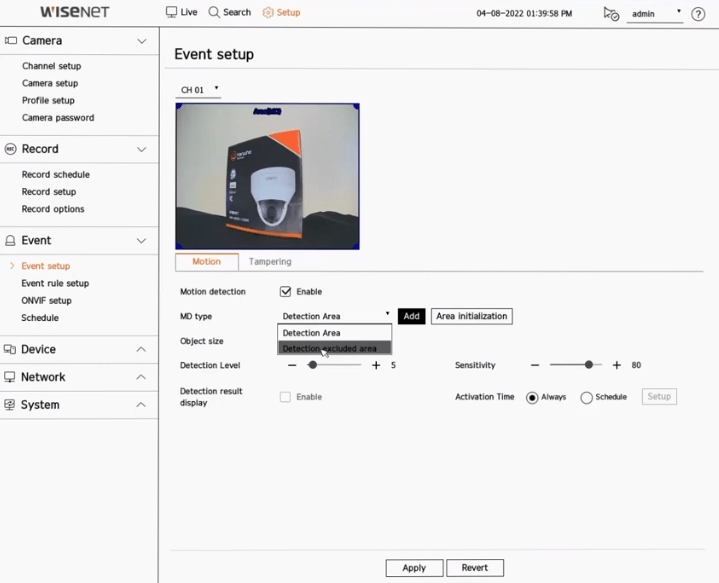
Step 6.2. Select “Event” and then choose “Event Setup” followed by “Motion Detection and IVA”.
Step 6.3. Adjust the Object Size settings if needed. If the camera is mounted higher than recommended, make the green minimum box smaller than a human in the field of view and set the red maximum setting to cover the entire field of view.
Step 6.4. Select “Detection Area” as the Event Zone type.
Step 6.5. Click on the blue rectangle box and draw your desired detection area on the camera view. Left-click and drag from the top right to the bottom left to create the blue area. This will increment the “DA” Detection Area counter to 1.
Step 6.6. Click “OK” at the bottom of the screen.
Step 6.7. Navigate to the “Record” menu and select “Record Schedule”.
Step 6.8. Choose either “Event” or “Event/Continuous” based on your preferences.
Step 6.9. Click on “All” in the top left corner of the schedule grid.
Step 6.10. Click “OK” to save the changes to the channel schedule.
Step 6.11. Select “Apply to Other Channels”.
Step 6.12. Check all channels.
Step 6.13. Click “OK” and then “OK” again at the bottom of the schedule screen.
Step 6.14. Go to “Event” and select “Event Rule Setup”.
Step 6.15. There should already be a rule for Motion on this screen. In the “Enable” column, click on the drop-down for the Motion rule and select “On”.


Step 7.1. View the ALPR results in your Plate Recognizer Dashboard. To access the Dashboard, just sign in to your Plate Recognizer Account
You can also easily forward the ALPR results over to ParkPow! Our sister company, ParkPow provides a full ALPR Dashboard and Parking Management solution so you can:
See the simple steps to integrate with ParkPow in under 5 seconds!
Alternatively, you can forward the ALPR results via webhooks to your system.
Getting good ALPR results? If not, then make sure to:
If you are still stuck, then Contact Us and include a screenshot of a vehicle passing through the camera.
Let us know and we’d be happy to assist.
© 2023 Plate Recognizer, a subsidiary of ParkPow, Inc. All rights reserved.
Made with ❤ from Silicon Valley & Budapest.